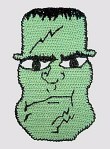
Instructions
With lt. celery yarn ch 20.
Rnd 1: hdc in 2nd ch from hook and in each ch across,
ch 2 and turn.
Rnd 2: hdc in each st across, working 2 hdc in last
st, ch 2 and turn.
Rnd 3: 2 hdc in 1st st, hdc in each st across,
2 hdc in last st, ch 2 and turn.
Rnd 4: 2 hdc in 1st 2 sts, hdc in each st across, 2
hdc in last st, ch 2 and turn.
Rnd 5: 2 hdc in 1st st, hdc in each st across, 2
hdc in last st, ch 2 and turn.
Rnd 6: Repeat rnd 4.
Rnd 7: Repeat rnd 5.
Rnds 8 & 9: hdc in each st across, ch 2 and turn.
Rnd 10: *hdc dec over 1st 2 sts, repeat from * twice,
hdc in each st across, ch 2 and turn.
Rnd 11: hdc in each st across, ch 2 and turn.
Rnd 12: *hdc dec over 1st 2 sts, repeat from * twice,
hdc in each st across, hdc dec over last 2 sts, ch 2 and
turn.
Rnds 13 thru 16: hdc in each st across, ch 2 and turn.
Rnds 17 and 18: 2 hdc in 1st st, hdc in each st
across, 2 hdc in last st, ch 2 and turn.
Rnds 19 thru 23: hdc in each st across, ch 2 and turn.
Rnd 24: hdc dec over 1st 2 sts, hdc in each st across,
hdc dec over last 2 sts, ch 2 and turn.
Rnd 25: hdc dec over 1st 2 sts, hdc in each st across,
hdc dec over last 2 sts, ch 5 and turn.
Rnd 26: hdc in 3rd ch from hook, hdc in each remaining
ch and st across, ch 5 and turn.
Rnd 27: hdc in 3rd ch from hook, hdc in each remaining
ch and st across, leave last 3 sts unworked. ch 2 and turn.
Rnd 28: hdc in each st across, leave last 3 sts
unworked. ch 2 and turn.
Rnds 29 thru 39: hdc in each st across, ch 2 and turn.
Rnd 40: hdc dec over 1st 2 sts, hdc in each st across,
hdc dec over last 2 sts, ch 2 and turn.
Rnds 41 and 42: *hdc dec over 1st 2 sts, repeat from
* once, hdc in each st across, hdc dec twice over last 4
sts, ch 2 and turn. Fasten off at end of rnd 42, weave in ends.
Attach black yarn anywhere on edge of head, work sc reverse st around
edge of head, fasten off, weave in ends.
Sc Reverse St... Working left to right, insert hook in next stitch
to the right, yarn over, draw yarn through stitch, yarn over, draw yarn through 2 loops on hook.